tag

Inspiration for the working mom

Showing posts with label Art projects. Show all posts

Friday, March 23, 2012

How to include the kids in Thanksgiving festivities

I hosted my second Thanksgiving in 2011.  We had a great family experience, with representatives from 3 states.  My kids were 4½ and 2½  at the time, and eager to pitch in and make the holiday a memorable event for the family. 

We started by taking a nature walk and collecting fall leaves in the neighborhood.  We took these home and pasted them with colorful feathers and paper from our craft box to make place mats.  After running through a laminating machine, we now have place mats that we used at Thanksgiving  and will continue to use for special occasions.

My husband and I did most of our prep throughout the week (crust-less sweet potato pie, chicken apple sausage stuffing,  and haricot verts with almonds made the night before) and saved the mashed potatoes, apple bread and crescent rolls and salad for the day of with the kids.  Mom handled the turkey which was delicious with a white wine basting base – no kids near the oven.

Already experienced chefs, the boys donned their aprons (gifts from Aunt Kim with football and baseball ornamentation and their names in the most perfect fabric ink ever) and pulled their chairs up the counter and we got to work!

Some good activities for kids in the kitchen:
·         Using/assisting with the potato ricer:  the boys really liked using the potato ricer (also one of my favorite kitchen gadgets) on the boiled potatoes and watching the “potato rain” come out the bottom. 
·         Measuring ingredients: when using a measuring cup, the boys tell me when I’ve poured ingredients to the height of the desired line, and they can use measuring spoons and cups with minimal assistance
·         Pouring the measured items into the mixing bowl (sometimes we’ll use two so each boy can stir independently)
·         Mixing with a spoon, fork or spatula
·         Making bread in a bread maker:  this one’s super easy – we just dump the ingredients and  push the button

When the kids eventually lost interest, I brought out the arts and crafts kit (see post on the Alex Big Box of Crafts).  We made paper chains in autumnal colors to decorate our windows and arch ways inside, and also traced our hands to make handprint-turkeys to decorate and post on the front door to give our guests a big welcome.


Sunday, October 30, 2011

Carving Jack-O-Lanterns

Prep time: Minimal
Activity time:  30 minutes

I carved my first Jack-O-Lantern in nearly 30 years this month.  After our trip to the pumpkin patch (see previous blog post “Our Long Island pumpkin patch adventure”) we bought a couple of carving tools in the farm’s store for under $3 each.  The boys decided they wanted to make a silly face (Zach) and a scary face (Elijah).  

I drew the designs on a piece of paper first, asking the boys for a lot of direction (What shape should the eyes be?  Do we want to add a nose?  How can we make the eyebrows scary!?)  Meanwhile, my husband was working on scooping out all the pumpkin guts to save for making toasted pumpkin seeds and pumpkin soup.

When we had a good idea of how we wanted our jack-o-lanterns to look, I handled the cutting. We had safety “knives” but the kids weren’t able to push hard enough to cut through the thick pumpkins.  Instead, once I had a feature fully cut, they helped me to push the item out of the pumpkin.  We had a lot more success pushing from the inside-out.  Another tip: I learned the hard way NOT to use a sharpie to draw the outline of the various face elements.  Translating the flat drawing to the spherical pumpkin surface proved a little tricky.  I ended up with the mouth way lower than I intended.  This may have been my severe lack of practice in pumpkin carving, but as a relatively well coordinated woman, well-versed in drawing simple faces, I was surprised at the utter mess I made with Take 1 with the sharpie.  However, we just turned the pumpkin around and tried again on the “new” front side. 

For Take 2, I carved the pumpkin’s features free hand.  This time, starting with the mouth to make sure I had it properly in position.  Next I did the eyes and eyebrows and worked my way toward the center of the face.  We scraped off the bits of shredded pumpkin falling into the path of our cut-outs inside the pumpkin, lit a candle inside the hollowed out pumpkin, and were amazed with our results!

Boo!


As for my husband’s side cooking project – the pumpkin soup turned out amazingly well!  Mike separated out the seeds for toasting with a little salt and put the pumpkin guts into a large pot.  He added milk, Splenda, salt, pepper, cinnamon and assorted spices and cooked until the pumpkin had softened.  We used an emulsion blender to make it all smooth texture (though you could scoop the liquid into a regular blender) and saved what we didn’t eat that day in plastic containers to freeze for Thanksgiving.


Friday, September 30, 2011

Beach in a jar (for summer all year long)

Prep time: Overnight
Activity time: 30 mins

We went to the beach a number of times this summer.  On our last trip, we collected shells, driftwood, rocks, pine cones and sand for our final beach art project. 
We disinfected each item with bleach to kill any micro-organisms (and those that are not so micro).  Following the directions on the bleach container, I submerged our treasures in pails with the appropriate mixture of bleach and water and soaked everything overnight.  I also soaked the sand in such a mixture.  
Disinfecting the sand (in jars), shells, rocks and driftwood
  The next day, we washed off the shells and rinsed the sand.  We then lay everything out in the sun to dry, spreading the sand out on plastic shopping bags to expose as much as possible to the air.  Once everything was dry (an hour or two for the shells and sticks, a bit longer for the sand) we put some sand in each jar and then layered in our sea shore items.   
The finished product


I have one beach jar on our living room shelves for the family to enjoy and the boys have a jar in their room by the window.  These will remind us of the great times we had as a family at the beach this summer and help us remember that next summer isn’t too far away.

Monday, September 5, 2011

The Alex My Giant Busy Box - The best craft box ever!


Elijah received the Alex “My Giant Busy Box” for his third birthday. I knew this was “activity gold” and I quickly hid it in a closet so it would be "new" for our beach vacation. The kids were extremely excited when I pulled this out – and I was excited to finally get to use it (4 months later)! 


More on the goods: the thing I loved most about the Busy Box is that it was all-inclusive, and I didn't need to buy anything additional to do any of the 16+ crafts.  The kit also includes a big chunky glue stick with glue that goes on purple and dries clear. This was not only very helpful to make sure everything sticks, but also for catching glue in unexpected places before it dries.

The kids' favorite activity was making paper bag puppets (popping out the animal body parts out of the perforated paper, gluing them down, and adding stickers to the finished product), There were 4, so each boy made 2. The puppets were colorful and the kids put on many impromptu puppet shows.  There were also a number of surprise wild animal sightings - it was like being on a safari!

We made the lion together and it was love at first sight!


There is also:
  • Sticker art (a park background with veggie, flower and animal stickers and a pizza with toppings) + frames
  • Tissue paper art with 8 colors of small tissue paper squares
  • Clay with cardboard animal limbs and eye to add in to create 3D animals
  • Chicken, sheep and piggy shaped pre-cut card stock with an assortment of goodies like pipe cleaners, feathers, paper accessories, flowers, buttons, and streamers to glue on.
We got through 1/3 to half of the activities in the “My Giant Busy Box” and are now bringing it home for our next rainy day.

“Tinker toys” on the cheap lead to hours of fun

The preparation for our beach vacation included a trip to the dollar store. We picked up 2 sets of “sticks and blocks” for $0.99 each (one set for each boy of course), filled with colorful mini-dowels and cubes with a hole drilled on each side. Very Tinker Toys-esque - and at a great price. 

I set up towels for the boys on the deck (so the sticks wouldn't fall through the holes in between the slats of wood) and the boys created structures and obstacle courses for their toys for over an hour.  Mom helped make a tower with a tunnel and the boys took it from there!


Sunday, July 17, 2011

Becoming PowerPoint authors (with a special thanks to Google)

Prep time:  0 mins
Activity time: 30 mins

Today Zach and Elijah became authors.  My kids are big fans of Cars and Cars 2, and all things race cars.  As usual, our Saturday morning started at 6:30, and the kids were clamoring to watch TV (Little Einsteins and the recreated Electric Company from Netflix were the two most frequent requests).  Rather than indulge my little TV-philes, I wanted to tickle their storytelling abilities and compose a story of our own together.

PowerPoint actually lends itself quite nicely for instant publishing.  It’s very easy to add text and insert pictures and we can print out our book when we’re done.  I asked the kids to first pick a topic for our book.  They chose race cars (big shocker).  We went online and did an image search on “race cars” for inspiration.  The boys took turns choosing cars to look at and use.  We decided the story would be about this super cool Ferrari race car we found. Then I asked Zach and Elijah questions to help get some basic character names and plot.  Zach got a little fixated on the letter F and our story was about Fifi the Ferrari, who on a freezing Friday in February lost his fuel injector.
Some sample pages from our book


 The boys crafted the story (Zach did most of the heavy lifting and Elijah contributed where he could) and I typed.   Our book is still a work in progress (we hit a 30-minute attention span limit), and we’re really happy with what we have so far!

Sunday, July 3, 2011

Rainy Day Pirates (and how to make a pirate ship in your living room)


Prep time: 2 mins
Activity time:  60 - 90 mins

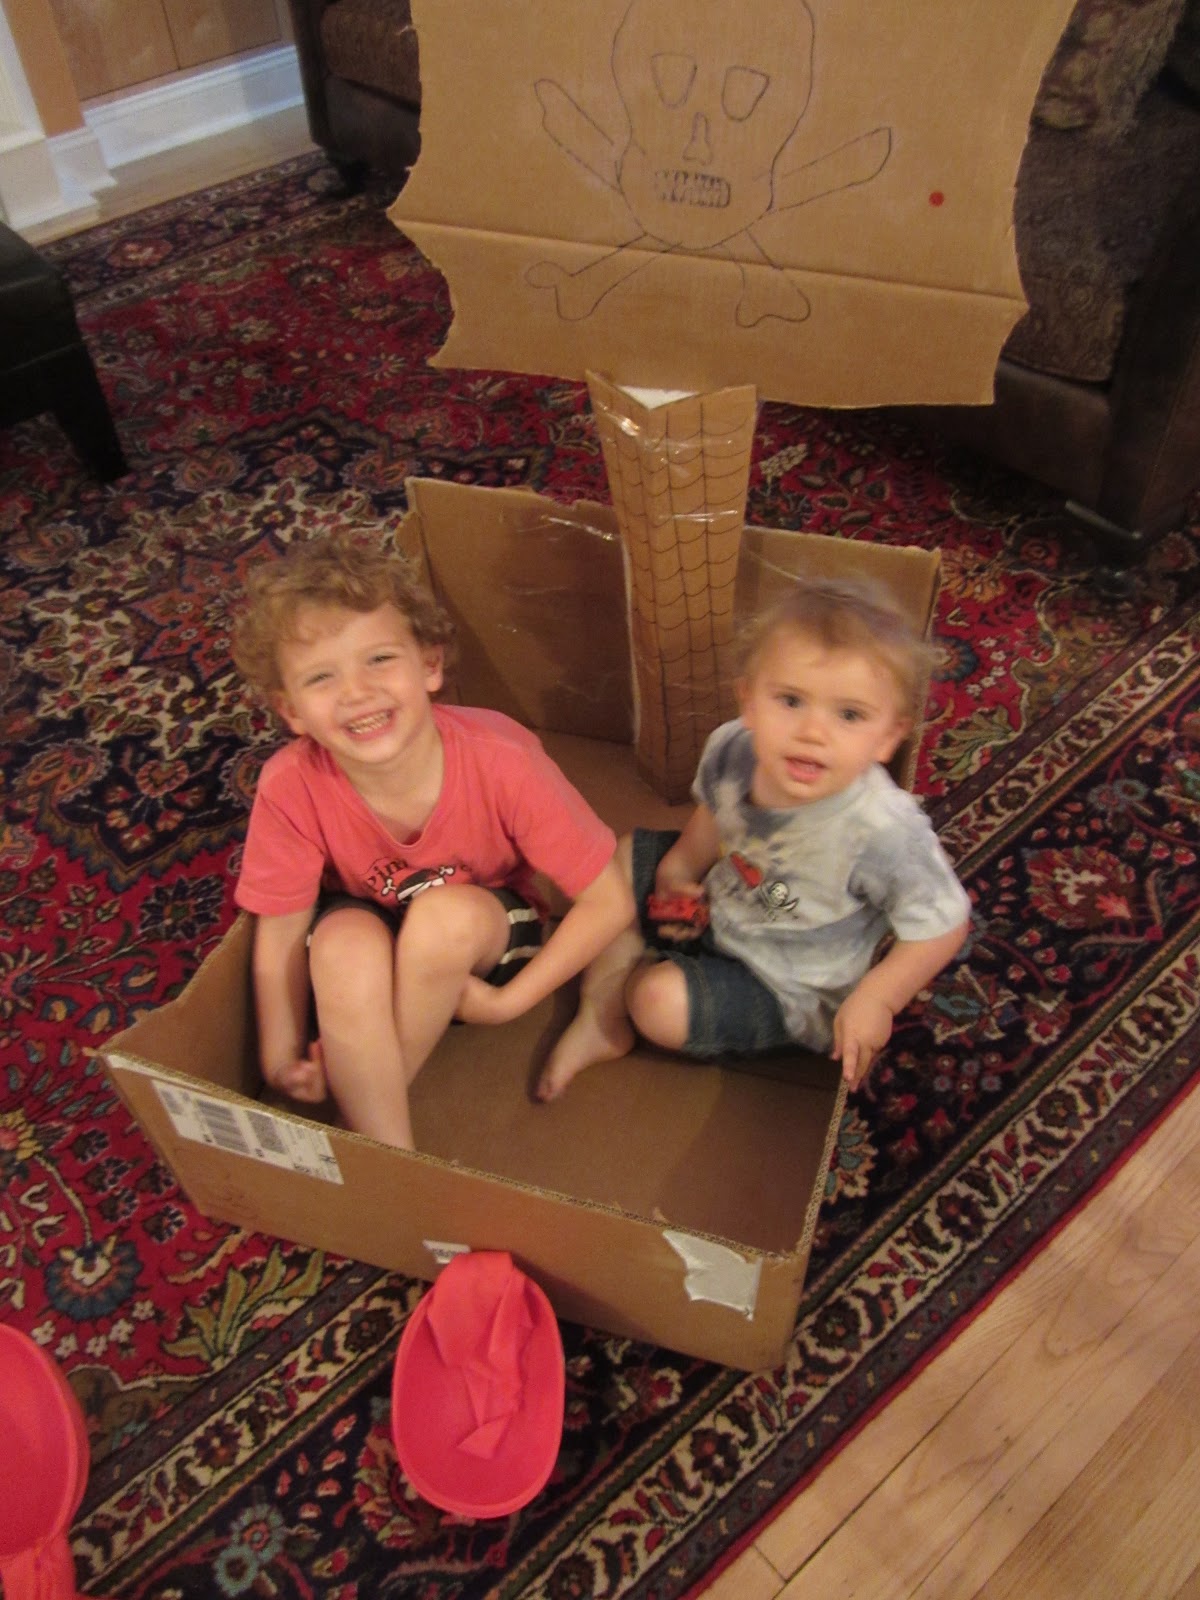
The forecast was for thunderstorms all day.  As usual, the boys were up by 6:30.  And my husband is out of commission with pneumonia. We had a bunch of cardboard boxes from some deliveries the night before, which were the perfect building blocks for making a pirate ship.

Zach and I went online and researched pictures of pirate ships and found one we wanted to use as our inspiration.  The boys got some chalk and we drew our design onto the biggest box.  I used a combination of scissors and a serrated knife to cut out the base of the boat and billowing sails. I actually found the knife easier for getting through the thick cardboard and creating curves.  Just watch those fingers! 

We used some of the foam packing material for the mast, plus a generous amount to tape to adhere the 2 mast pieces to each other, as well as the base of the boat.  We looked online again for pictures of a Jolly Roger that I could actually draw and then used chalk to make the design.  Once we were happy with it, I went over it with a black sharpie, and used a damp paper towel to “erase” the chalk.  Using the same “generous amounts of tape” technique, we connected the sail to the mast. Then we covered the foam mast with cardboard cut from the corner of one of the boxes. We used a spider web style design for the ladders up to the crow's nest to complete our beautiful ship!

Our pirate ship, constructed from a computer box

We practiced some choice pirate phrases (including “ahoy me mateys,” “shiver me timbers” and Elijah truly mastered “Arrrrrg!”) and the boys spent all morning in the boat. They were really proud to show their daddy when he came out for some chicken soup.

Just add pirates

Saturday, June 11, 2011

Beach inspired arts and crafts

Prep time: 20 minutes 
Activity time: 30-90 mins.

I just got back from Fire Island, NY and was totally inspired by the shells and rocks my kids collected on our short beach vacation.  
Painted shells are a cottage kids industry in Fire Island, (ranked with lemonade stand wagons) and I saw some shells that made me look twice.  Some enterprising young ladies added giant googly eyes to their shells to an amazing effect.  My kids will love this!  We can also transfer their love of drawing and sketching on paper at home to painting and decorating rocks and shells during our next beach visit. Pick an artistic color palette for a canvas of assorted shells, rocks and twigs, and your budding artist will be ready to go.

Be sure to add drift wood to your collection.  You may find beautiful found art worth adding to your walls as-is.  Even if you're less interested in adding rustic art to your home, chunky driftwood will provide a nice base for gluing the rocks, twigs, and shells (decorated or au naturale).

You can make great gifts and home decor with this project as well.  Here are some initial ideas:
* Put your treasures into:
     Hurricane candle stands
     Small or interesting fish tanks
     Glass tumblers
     Vases
* Paste around an inexpensive plain, wooden picture frame (or many picture frames to create a vignette on the wall)
* Driftwood!

Note that it may help to visit a craft store for googly eyes, glitter paints, and other ad ons (in addition to the glue and markers I assume you already have at home), as well as giftable items to put them on such as photo frames, cardboard or small wood memory boxes, glass hurricane lamps, etc.

Rainbow Eggs art project

Prep time: 2-10 mins
Activity time: 30 mins
Follow up activity: 30 mins to hours of fun

Tonight we are making Rainbow Eggs.

I'm also going to turn this into a cooking project and either hard boil the eggs or hollow out the eggs and scramble the insides.  Either way, this efficient Mama is making dinner at the same time!

Hard boil or hollow the eggs.  To hollow the eggs, use a sharp cooking took like a skewer, base of a meat thermometer, or sharp knife (very carefully please!) and poke a small hole at either end of the egg.  Then empty the yolk and white into a bowl by blowing into one of the holes so the force of your breath pushes the egg through the bottom hole and into the container.

I recommend going with the hollowed out eggs because you can turn this into a craft project for later in the day or the following day.  Besides, it is oddly satisfying to blow the eggy insides out :)

I purchased an Easter egg dyeing kit on sale the day after Easter and it's been in my craft closet ever since.  We'll use this kit and follow the directions.  Our kit includes a wax pencil so we can create negative space where the dye won't adhere, stickers and more fun add-ons.  If you are using food coloring or a smaller kit, your own glitter, puffy paint, or stickers will also do the trick nicely.

Once you dye and dry your eggs, you can create additional projects.  Here are some ideas for the next day:
*turn your egg carton upside down and insert 1/4 the length of the toothpick into each inverted bump.  Now, stand your hollow egg on the remainder of the toothpick as a stand.  This can be a pretty Spring centerpiece.
* create a crowd scene by following the above stand instructions and add googly eyes; felt or paper clothes, yarn for hair, etc. to make your eggs into people (or animals or aliens).
* purchase foam balls and tooth picks to create an egg tree.  Glue the foam together in odd ways, securing the base to your egg carton, balance in a mini flower pot, etc.  Then stick the toothpicks 1/2 of the length in and attach your eggs through one of their holes.  You an also try stacking eggs on top of each other using toothpicks to connect them to one another (with 1/2 of the toothpick inside each adjoining egg).
*create egg snowmen using the above connection device (one toothpick inserted 1/2 way inside each egg) and then decorate your man.
*break up your eggshells into a little colorful people and make a mosaic design.  You can even glue them to pictures in a coloring book for alternative ways to color.
This works with either hollowed eggs or hardboiled. Just save your shells after you eat your eggs.

The list goes on and on - let your kids' creativity loose!  Have an egg-selent adventure!